Why NestJS forces good architecture by default
NestJS is opinionated in the right ways. Its module system, dependency injection container, and decorator-based API surface area push developers toward separation of concerns, inversion of control, and domain-driven organization — patterns that are valuable in any backend codebase but are especially critical in enterprise applications where teams grow, requirements evolve, and the cost of a poor initial architecture compounds over years.
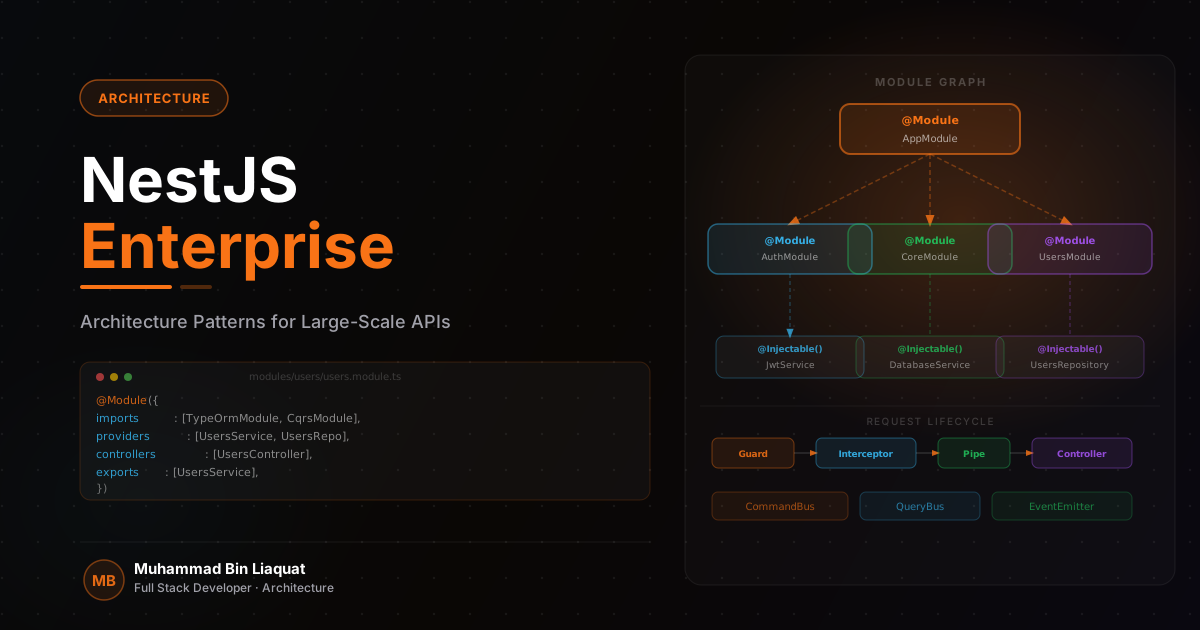
The framework's Angular-inspired structure is its most misunderstood feature. Developers who come from Express dismiss the module system as boilerplate and write a single AppModule with everything in it. That is the anti-pattern. The module system is what makes NestJS scalable — each module encapsulates a domain (users, billing, notifications, reporting) with its own providers, controllers, and exported services. Modules declare exactly what they expose to other modules, creating explicit dependency boundaries that prevent the spaghetti import graphs that make large Express codebases unmaintainable.
The dependency injection (DI) container is what NestJS contributes that raw Express cannot. In Express, services are typically singletons imported directly — creating tight coupling between callers and implementations. NestJS's DI container resolves providers by token, allowing you to swap implementations (real database service vs. test stub, live payment processor vs. mock) without changing the consumer code. This inversion of control is what makes unit testing of service logic tractable without spinning up a full HTTP server.
The request lifecycle — Guards → Interceptors → Pipes → Controller → Service → Response — is the architectural skeleton that handles cross-cutting concerns consistently. Authentication, authorization, request validation, response transformation, and error normalization all have designated places in this lifecycle. Knowing which layer owns which responsibility, and keeping that assignment consistent across the codebase, is what distinguishes a maintainable NestJS application from one that devolves into ad-hoc middleware chains.
- Structure every domain as its own NestJS module — never build a monolithic AppModule with all providers.
- Use the DI container to inject service interfaces, not concrete implementations — enables testing without mocks.
- Map each request lifecycle stage to its correct layer: auth in Guards, validation in Pipes, business logic in Services.
- Define what each module exports explicitly — unlisted providers are private to the module by design.
- Treat modules as the unit of code ownership in multi-team projects — one team owns one or more modules.
Module architecture and domain-driven organization
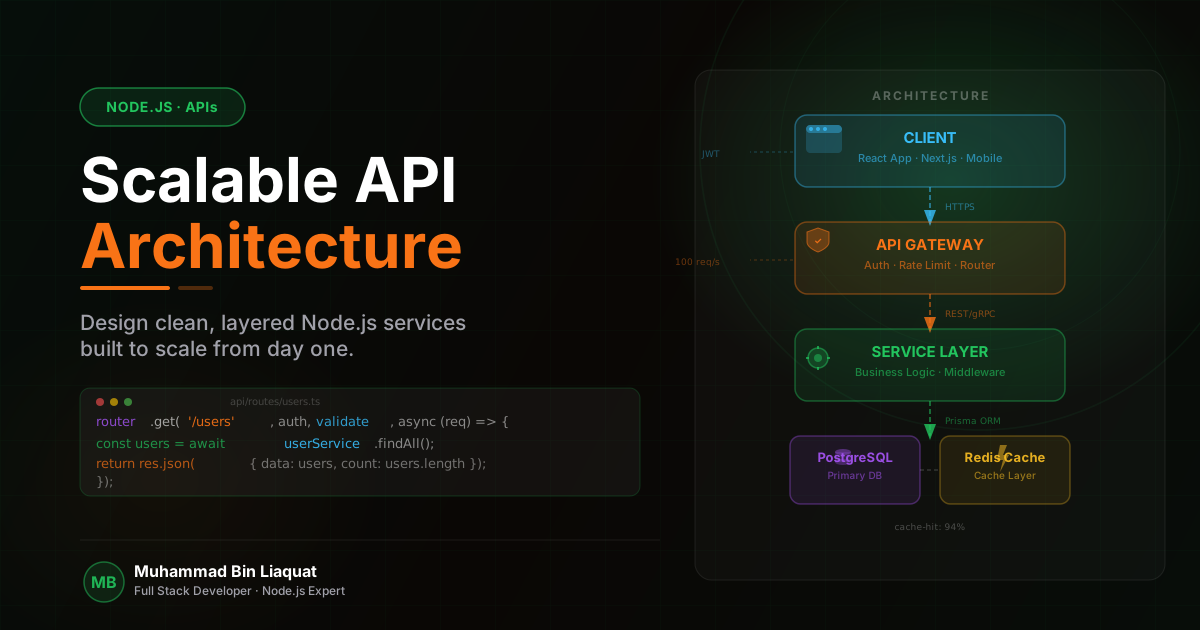
The single most impactful architectural decision in a NestJS application is how to draw module boundaries. Modules organized by technical type (a ControllerModule, a ServiceModule, a RepositoryModule) produce the same problems as MVC's horizontal layering — every feature change touches multiple modules, and testing requires assembling the entire stack. Modules organized by domain (UserModule, BillingModule, NotificationModule) produce cohesive, independently deployable units where changes to billing never touch user code.
Each domain module follows a consistent internal structure: a module file that wires providers and controllers, a controller that handles HTTP routing and delegates to the service, a service that contains business logic and orchestrates repository calls, a repository that handles all database queries, and DTO (Data Transfer Object) classes that define the shape of incoming and outgoing data. This layering is the NestJS implementation of the layered architecture pattern, enforced by the module boundary rather than by convention.
Feature modules import shared infrastructure modules (DatabaseModule, ConfigModule, CacheModule) from a CoreModule that is globally registered in AppModule. Domain modules never import infrastructure directly — they depend on the abstraction that CoreModule exports. This indirection means swapping the database driver, caching backend, or configuration source requires changes in exactly one place — the CoreModule — rather than in every domain module that uses the infrastructure.
Circular module dependencies — ModuleA imports ModuleB which imports ModuleA — are a design smell that NestJS handles with `forwardRef()` but should be treated as a refactoring trigger, not a tool to use routinely. Circular dependencies indicate that two modules are too tightly coupled and likely belong in the same module, or that a shared concern should be extracted into a third module that both can import without creating a cycle.
- Organize modules by domain, not by technical type — one module per business capability.
- Use a globally-registered CoreModule to provide shared infrastructure (database, config, cache) to all domain modules.
- Keep the internal structure of every module consistent: controller → service → repository → DTO.
- Treat `forwardRef()` as a refactoring signal — circular dependencies indicate incorrect module boundaries.
- Export only the services that other modules legitimately need — keep all other providers module-private.
Dependency injection and the provider system in depth
NestJS providers are any class decorated with `@Injectable()` — services, repositories, factories, helpers. The DI container manages their lifecycle (singleton by default, request-scoped when needed) and resolves them by injection token. Understanding how tokens work unlocks the most powerful DI patterns: custom providers, async factories, and interface-based injection that enables clean testing without mocking frameworks.
Custom providers are the mechanism for scenarios that constructor injection alone cannot handle: providing an existing class instance (useValue), using a factory function for initialization that requires async logic or configuration (useFactory), or registering a class under an interface token (useClass). The most common production use case is async provider factories — connecting to a database, loading secrets from AWS Parameter Store, or initializing an SDK that requires configuration before it can be used.
Request-scoped providers (`scope: Scope.REQUEST`) create a new provider instance for each incoming HTTP request and inject a reference to the current request object. This is essential for any provider that needs per-request context — the authenticated user identity, the tenant ID in a multi-tenant application, or request-specific logging metadata. Use request scope deliberately — it prevents the provider from being cached in the singleton container and creates a new instance for every request, which has performance implications at high traffic.
Interface-based injection replaces concrete class tokens with abstract class or Symbol tokens, allowing different implementations to be registered for different environments. Declare an abstract class or interface (UserRepository), inject it by token in the service constructor, and register the concrete implementation (PostgresUserRepository or InMemoryUserRepository) in the module's providers array. The service never knows which implementation it's running against — the module decides at composition time.
- Use `useFactory` with `async` for providers that require asynchronous initialization (database connections, secret loading).
- Use `scope: Scope.REQUEST` only when the provider genuinely needs per-request context — avoid it by default.
- Register concrete implementations under abstract class tokens to enable implementation swapping without changing consumers.
- Use `forwardRef()` in constructor injection only as a last resort — prefer extracting shared logic to a third provider.
- Inspect the DI graph in development with NestJS DevTools to catch unresolved dependencies before deployment.
Guards, interceptors, and pipes: the request lifecycle
The NestJS request lifecycle gives every cross-cutting concern a designated home. Guards run before the route handler and determine whether the request is authorized to proceed — they return true (allow) or false (deny). Interceptors wrap the route handler execution and can transform both the incoming request and the outgoing response — they are the right place for logging, response normalization, caching, and performance measurement. Pipes transform or validate the incoming data before it reaches the handler.
Authentication and authorization guards are the most critical use of the lifecycle. An AuthGuard validates the JWT or session token, attaches the decoded user to the request context (using ExecutionContext), and throws an UnauthorizedException if validation fails. A separate RolesGuard checks whether the authenticated user has the required roles for the specific route (declared via a `@Roles()` decorator). Separating authentication (who are you?) from authorization (what can you do?) into two guards keeps each guard simple and independently testable.
Global interceptors are the correct place for response envelope normalization — wrapping all successful responses in a `{ data, meta, timestamp }` envelope — and for logging request/response pairs with structured metadata. Register them globally in AppModule using `APP_INTERCEPTOR` to ensure consistent behavior across all routes without requiring each controller to apply the interceptor individually. The alternative, decorating each controller with the interceptor, is error-prone and tends to drift as controllers are added.
ValidationPipe with class-validator and class-transformer is the standard approach for request body validation in NestJS. Decorate your DTO classes with validation constraints (`@IsEmail()`, `@IsNotEmpty()`, `@MinLength(8)`), configure the global ValidationPipe with `whitelist: true` (strip unknown properties) and `forbidNonWhitelisted: true` (throw on unknown properties), and register it globally. This eliminates a category of injection and pollution attacks and makes API contracts explicit and enforceable at the framework level.
- Separate AuthGuard (authentication) from RolesGuard (authorization) — two concerns, two guards.
- Register logging, response normalization, and performance interceptors globally via `APP_INTERCEPTOR`.
- Configure ValidationPipe globally with `whitelist: true` and `transform: true` — never per-route.
- Use `@UseGuards()` at the controller class level, not the method level, to prevent accidentally unprotected routes.
- Test guards and interceptors in isolation with NestJS's testing utilities — do not rely on end-to-end tests alone.
CQRS and event sourcing patterns in NestJS
Command Query Responsibility Segregation (CQRS) separates write operations (commands) from read operations (queries) into distinct handler classes. In NestJS's `@nestjs/cqrs` module, a Command is a plain object describing an intent (`CreateUserCommand`), a CommandHandler executes the command and produces side effects, a Query describes a read intent (`GetUserByIdQuery`), and a QueryHandler fetches and returns data. This separation produces a codebase where every operation has a single, focused handler that can be unit-tested without HTTP, and where read and write paths can be independently optimized.
The practical benefit of CQRS in enterprise applications is not the architectural purity — it's the testability and extensibility. A CommandHandler that creates a user, sends a welcome email, and logs an audit event can be tested with a mocked EventBus and a mocked UserRepository, without spinning up SMTP, a database, or a logging service. Adding a new reaction to the UserCreated event (sending a Slack notification, triggering an onboarding workflow) requires adding a new EventHandler without modifying the existing CreateUserCommandHandler.
Event sourcing extends CQRS by making domain events the source of truth. Instead of storing the current state of an entity directly, the application stores the sequence of events that produced that state (`UserRegistered`, `UserEmailVerified`, `UserSubscriptionUpgraded`). The current state is derived by replaying the event sequence. NestJS provides the infrastructure for aggregate roots and event stores, but event sourcing is not appropriate for all applications — it adds complexity that is only justified when the audit trail, temporal queries, or event replay capabilities are genuine requirements.
The EventBus in `@nestjs/cqrs` decouples command handlers from the side effects their commands produce. When CreateUserCommandHandler dispatches a UserCreatedEvent, all registered EventHandlers (WelcomeEmailHandler, AuditLogHandler, AnalyticsHandler) execute independently — the command handler does not know or care about them. This publish-subscribe pattern makes it straightforward to add new system behaviors in response to existing events without modifying the source of those events.
- Use CQRS when write logic is complex enough to benefit from dedicated CommandHandlers — not as a default for all applications.
- Dispatch domain events from CommandHandlers via EventBus — never call other services directly from a handler.
- Keep Commands and Queries as simple plain objects with no methods — they describe intent, not behavior.
- Use event sourcing only when audit trails, temporal queries, or event replay are genuine product requirements.
- Test CommandHandlers and EventHandlers in isolation using NestJS's testing module with mocked dependencies.
Testing strategies for NestJS applications at scale
NestJS's testing module mirrors the production module system — `Test.createTestingModule()` accepts the same module definition as the real module, allowing you to override specific providers with test doubles while the rest of the module wires normally. This design makes unit testing service logic straightforward: create a testing module with the service under test and mock implementations of its dependencies, then call the service methods directly without touching HTTP, the database, or any external services.
Unit tests cover service and handler logic in isolation. Integration tests cover the interaction between the service layer and the real database using a dedicated test database seeded with known data. E2E tests cover the full HTTP stack using NestJS's Supertest integration. The testing pyramid applies: many unit tests (fast, isolated, cheap), fewer integration tests (slower, real database, needed for complex queries), and a small number of E2E tests (slowest, validates the full request lifecycle for critical flows).
Test database management is the most important operational concern in NestJS integration testing. Use a separate test database (not a schema on the production or development database) with migrations run before each test suite and transactions rolled back after each test case. Rolling back transactions rather than truncating tables after each test is significantly faster and produces deterministic test isolation. TypeORM's `EntityManager.transaction()` and Jest's `beforeEach`/`afterEach` hooks make this pattern straightforward to implement.
Contract testing with Pact or OpenAPI schema validation ensures that the API responses your NestJS application produces match what consuming clients expect. As the API evolves, contract tests catch breaking changes before they reach integration environments. For internal service-to-service contracts (microservices calling each other), consumer-driven contract tests are more appropriate than schema validation alone — they guarantee that the specific response fields each consumer uses are always present, regardless of what else the API exposes.
- Use `Test.createTestingModule()` with overridden providers for unit tests — avoid testing through the HTTP layer.
- Run integration tests against a dedicated test database with migrations and per-test transaction rollback.
- Follow the testing pyramid: many unit tests, fewer integration tests, a small E2E suite for critical flows.
- Use Pact or OpenAPI schema validation for contract testing between services — catch breaking changes before deployment.
- Run the full test suite in CI on every pull request — never merge code that breaks integration tests.
Share this article
Help others discover this resource and extend the reach of the content.